

Followers message a community at any hour — at night, on weekends, on holidays. Answering everyone by hand takes time, and canned auto-replies annoy people. An AI bot replies right away and to the point: it advises on products, books appointments and answers common questions — in the words and tone you give it.
In GPTunneL you can build such a bot without programming. The bot builder used to work only with Telegram; now the same bot also connects to VK (VKontakte) and MAX. Instructions, model and limits are shared, and channels are switched on in the “Channels” tab.
Below is the whole path from an empty bot to the first reply in the community's messages.
What you need
- a GPTunneL account with a positive balance — AI replies are paid from it;
- a VK community where you are an administrator (editors don't have access to the API section).
If you don't have a community yet, create one under “Communities” → “Create community”. The type and topic don't matter for the bot.
Step 1. Create a bot in GPTunneL
Open the “Bots” section and click “Add a bot”.
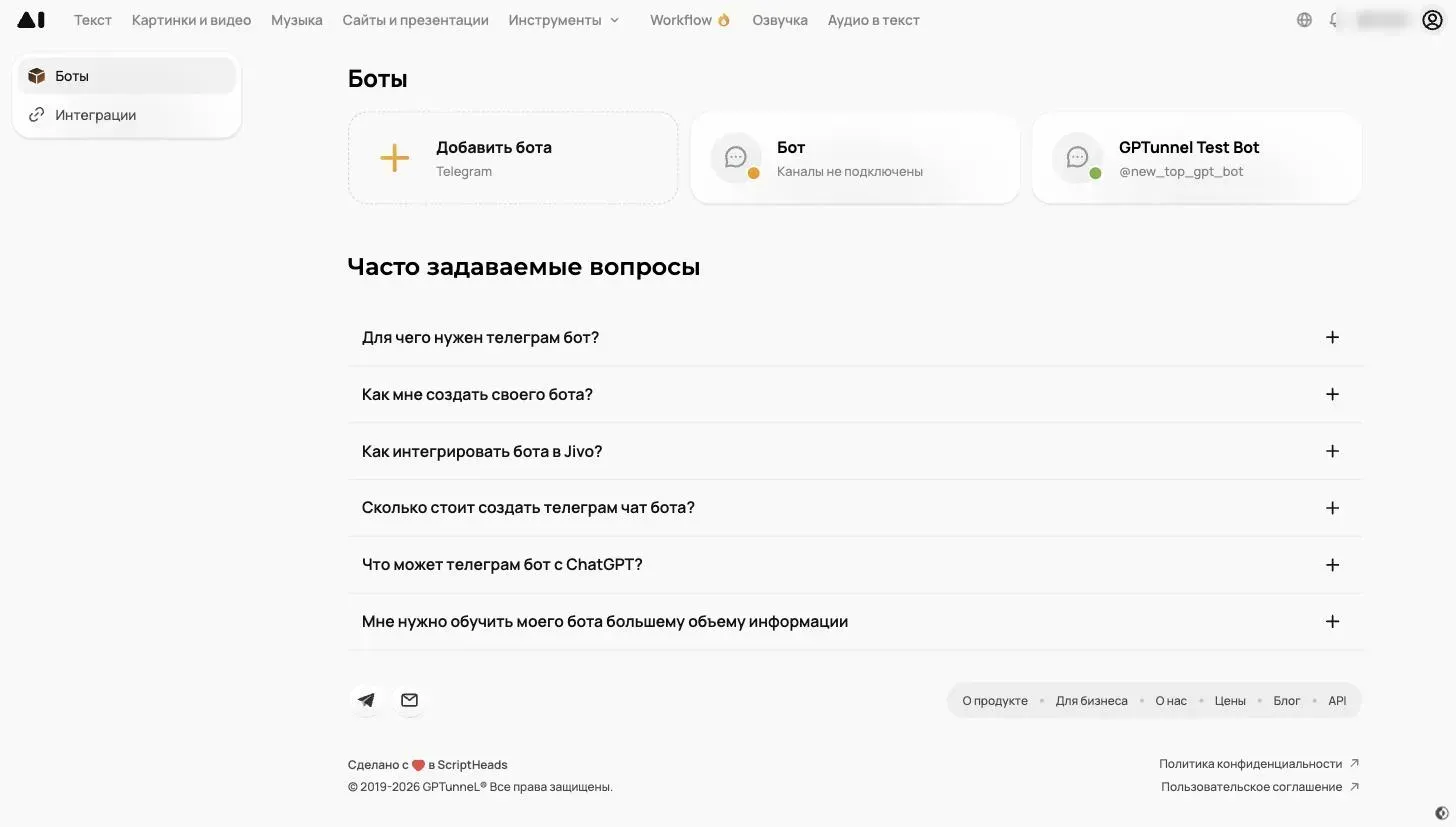 The “Bots” section: all your bots live here, and a new one is added with the “Add a bot” card.
Fill in the settings:
- Bot name — how the bot appears in your list. You can leave it empty: the community name will be used when you connect it.
- Welcome message — a person receives it when they first open a chat with the community or press the “Start” button.
- Instructions to the assistant — the main field. Describe who the bot is, what it talks about and what it stays silent on, and what tone it uses. The more specific, the better.
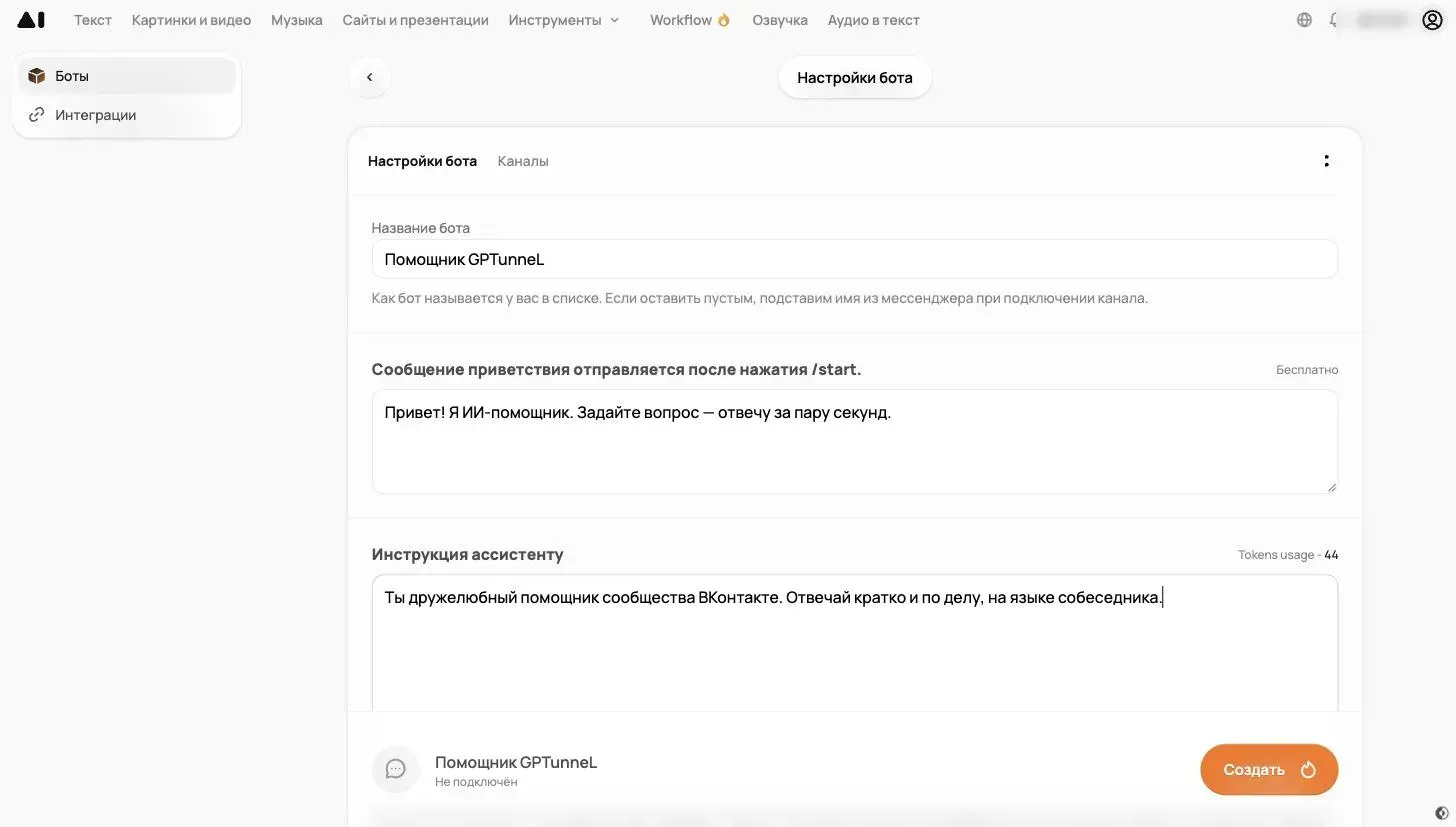 Name, welcome message and instructions to the assistant — everything you need for the first launch.
Below, choose the bot model and the context length — how many recent messages the bot remembers in a conversation. For customer questions 5–10 messages are enough. The price per thousand tokens is shown under the model name: it helps you estimate costs.
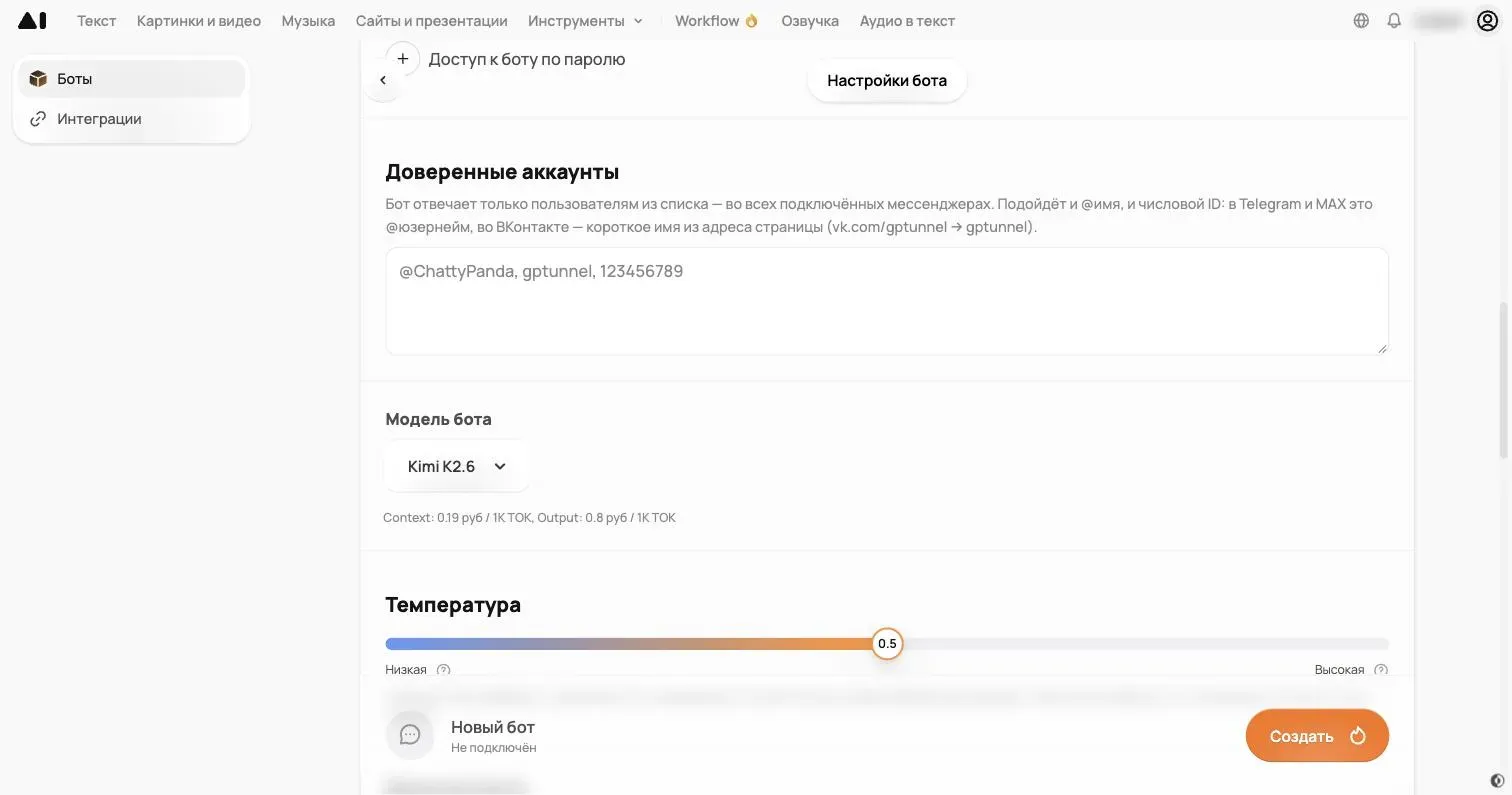 Bot model: the price for context and reply per thousand tokens is shown under its name. A stronger model answers more precisely, a lighter one costs less.
Click “Create” — the “Channels” tab opens.
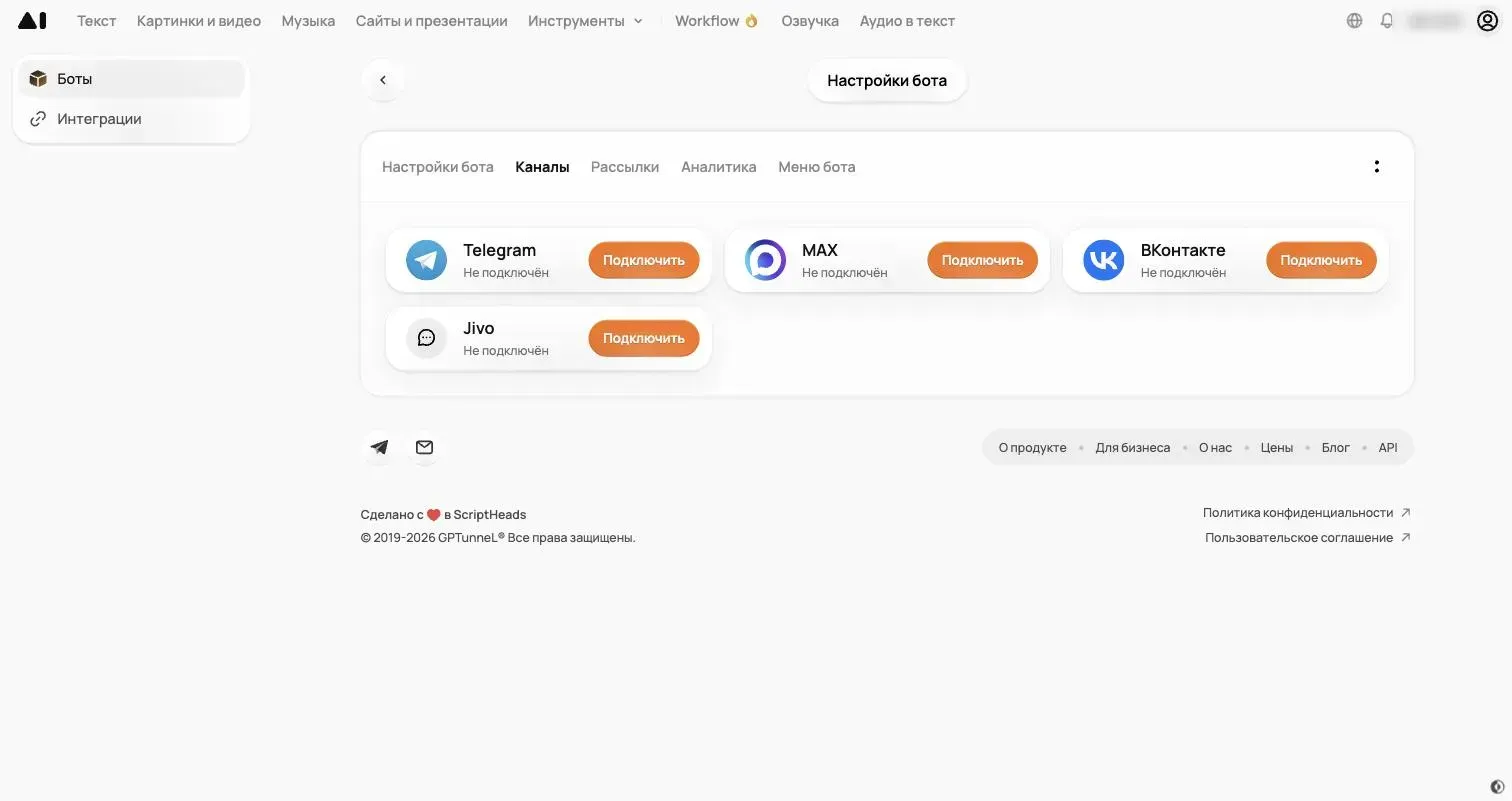 The “Channels” tab: one bot, several messengers. We need the VK card.
Keep it open and open your VK community in another browser tab.
Step 2. Enable community messages
On the community page, click “Manage”.
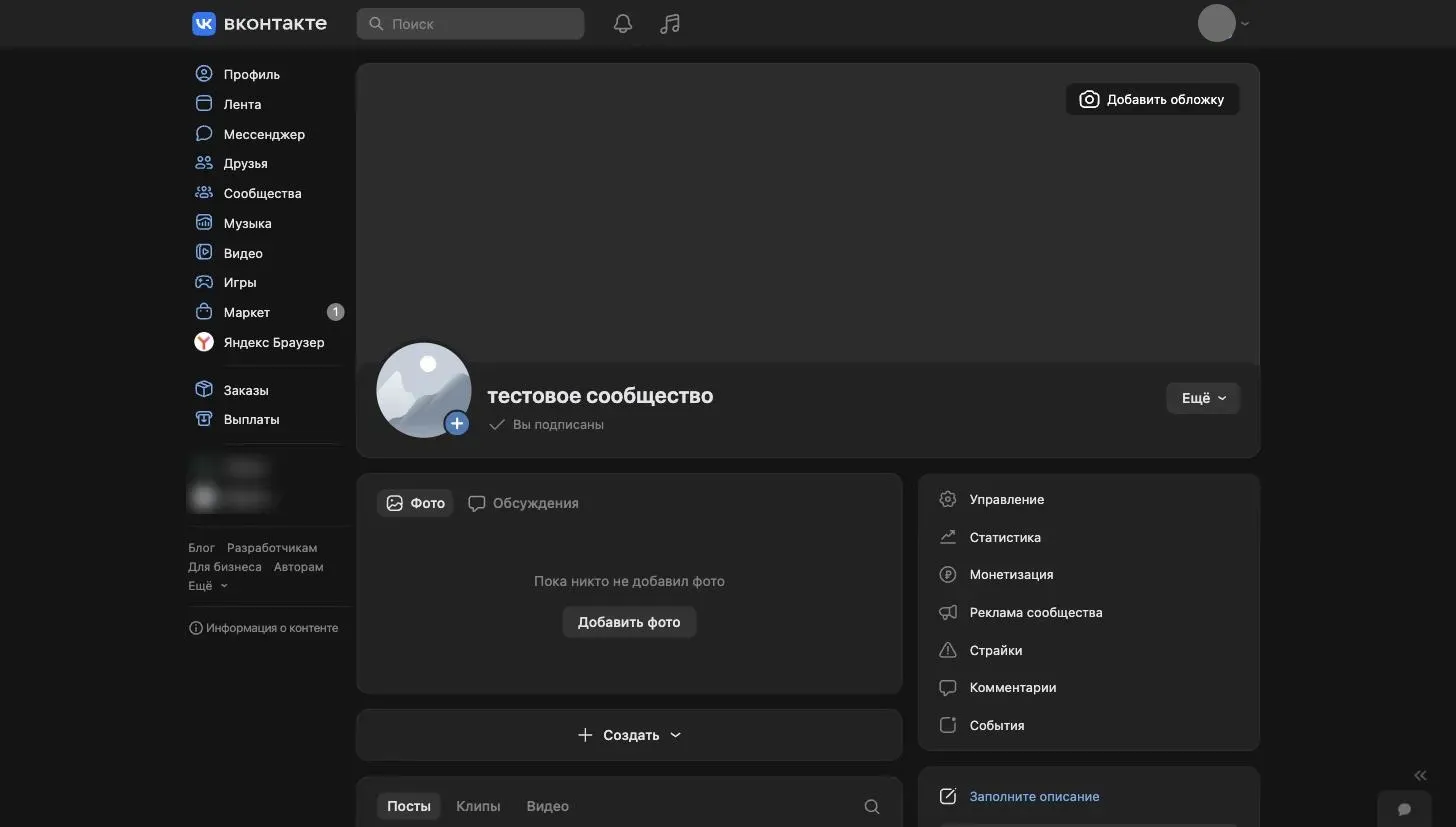 The “Manage” button is in the right-hand block of the community page.
Open the “Messages” section and set “Community messages” to “Enabled”.
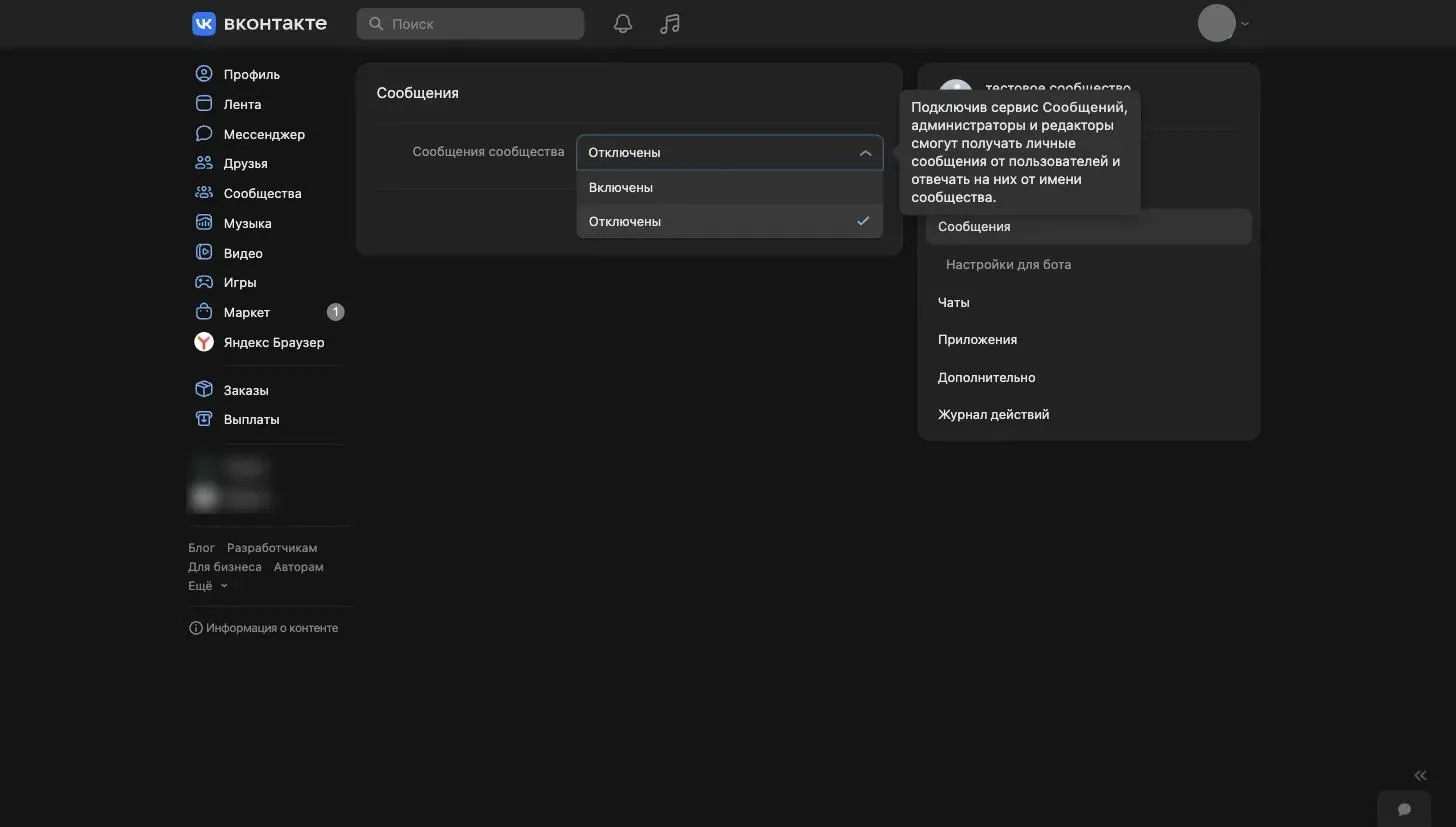 Without community messages nobody can write to the community — and the bot has no one to answer.
Leave the “Greeting” field empty: the bot sends the welcome message you wrote in GPTunneL. Click “Save”.
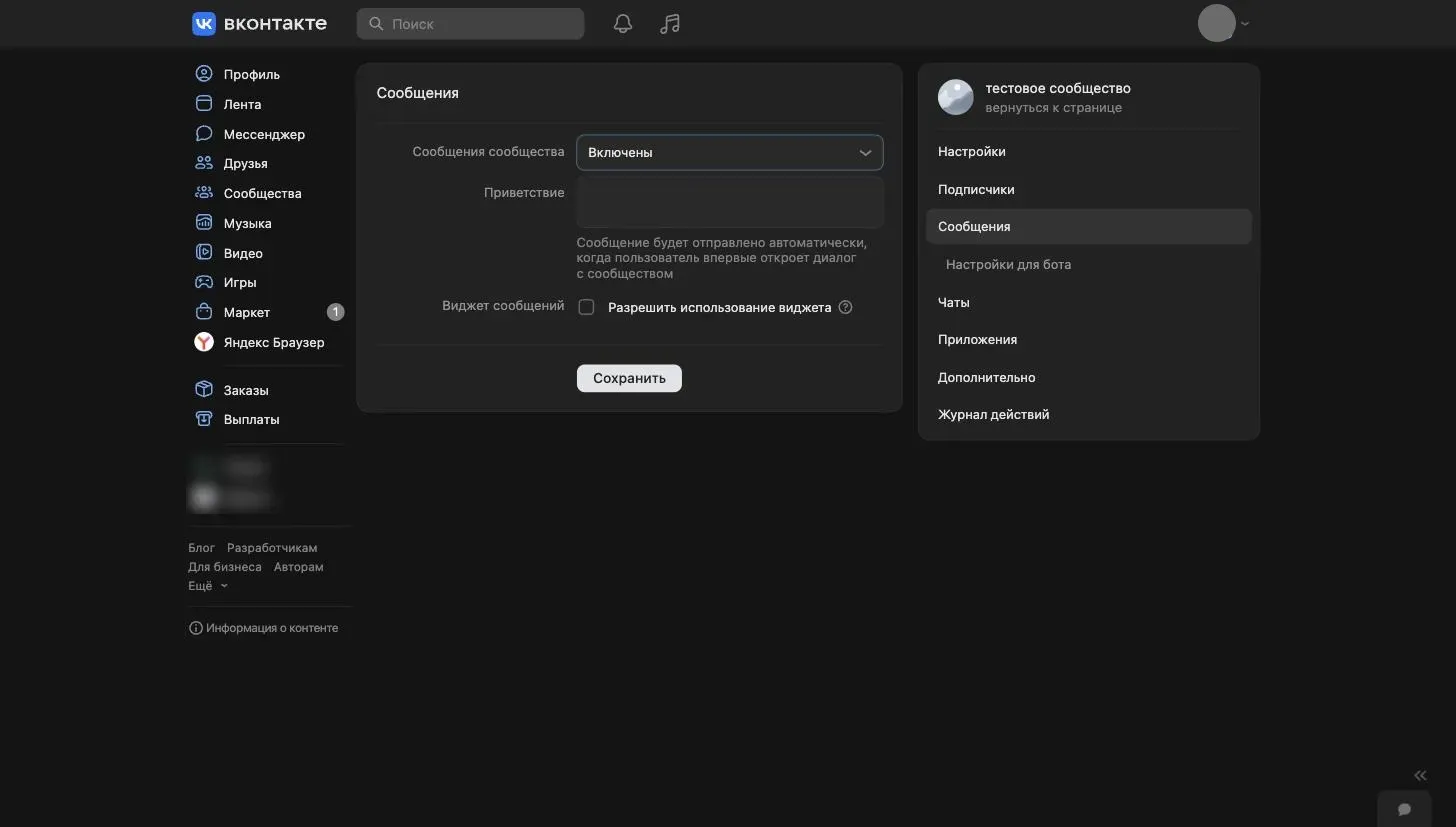 Messages are enabled. We leave the VK greeting empty, otherwise people get two greetings in a row.
Step 3. Enable bot features
In the same section, open “Bot settings”:
- set “Bot features” to “Enabled”. Without this, the bot's menu buttons won't work;
- tick “Add the Start button” — a new visitor sees the button and gets the welcome message right away.
Click “Save”.
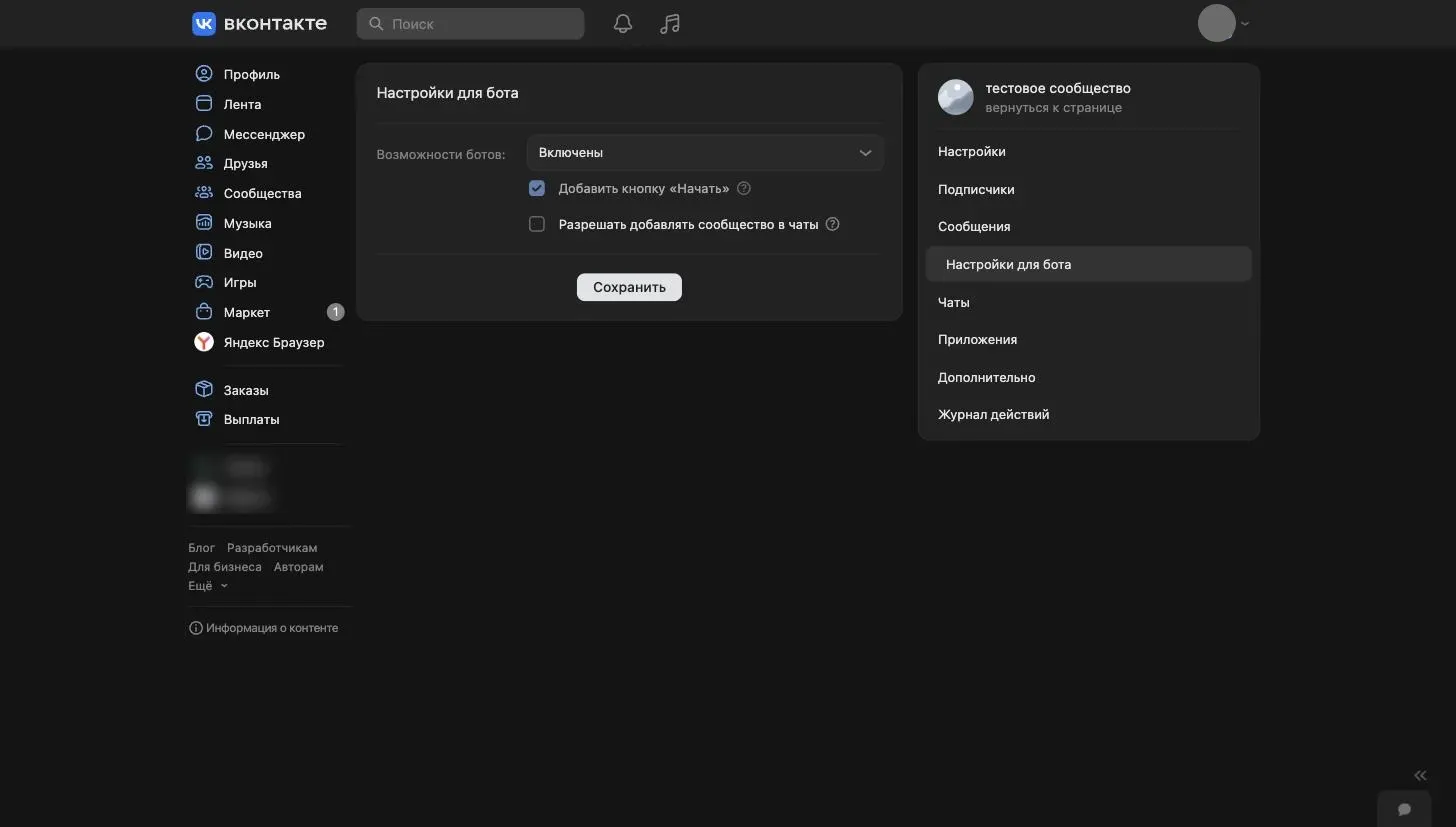 “Bot features” turn on keyboards and buttons in messages; “Start” is the first touch with the bot.
The bot replies only in the community's private messages. You don't need to add it to group chats: VK group chats aren't supported yet.
Step 4. Create an access key
Go to “Advanced” → “API usage”.
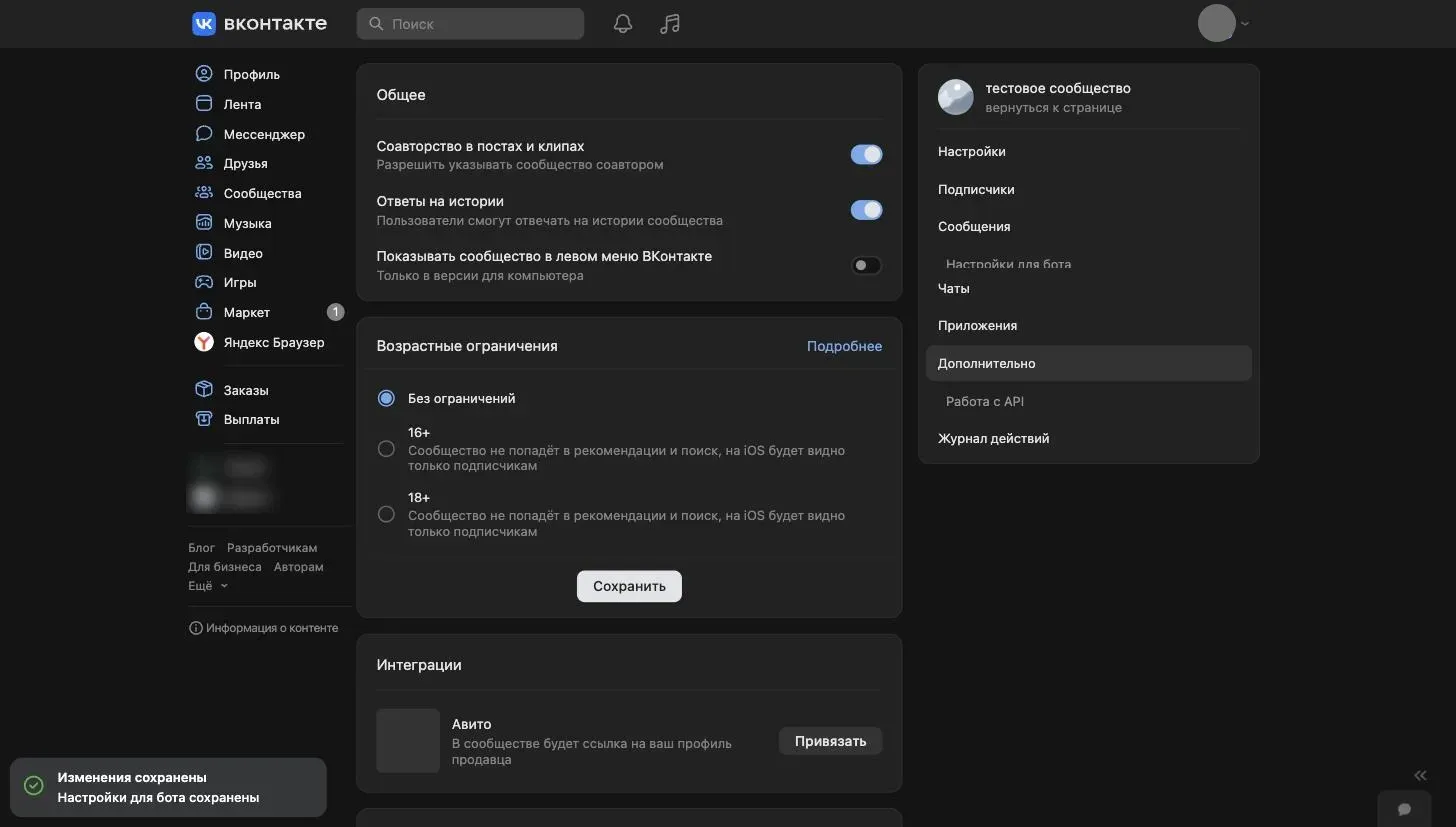 “API usage” is tucked away under “Advanced” — it's a sub-item there.
On the “Access keys” tab, click “Create key” and tick the permissions:
- access to community messages — required, otherwise the bot can't reply;
- access to community photos — so the bot can send images;
- access to community documents — so the bot can send files.
The bot doesn't need any other permissions — don't grant more than necessary.
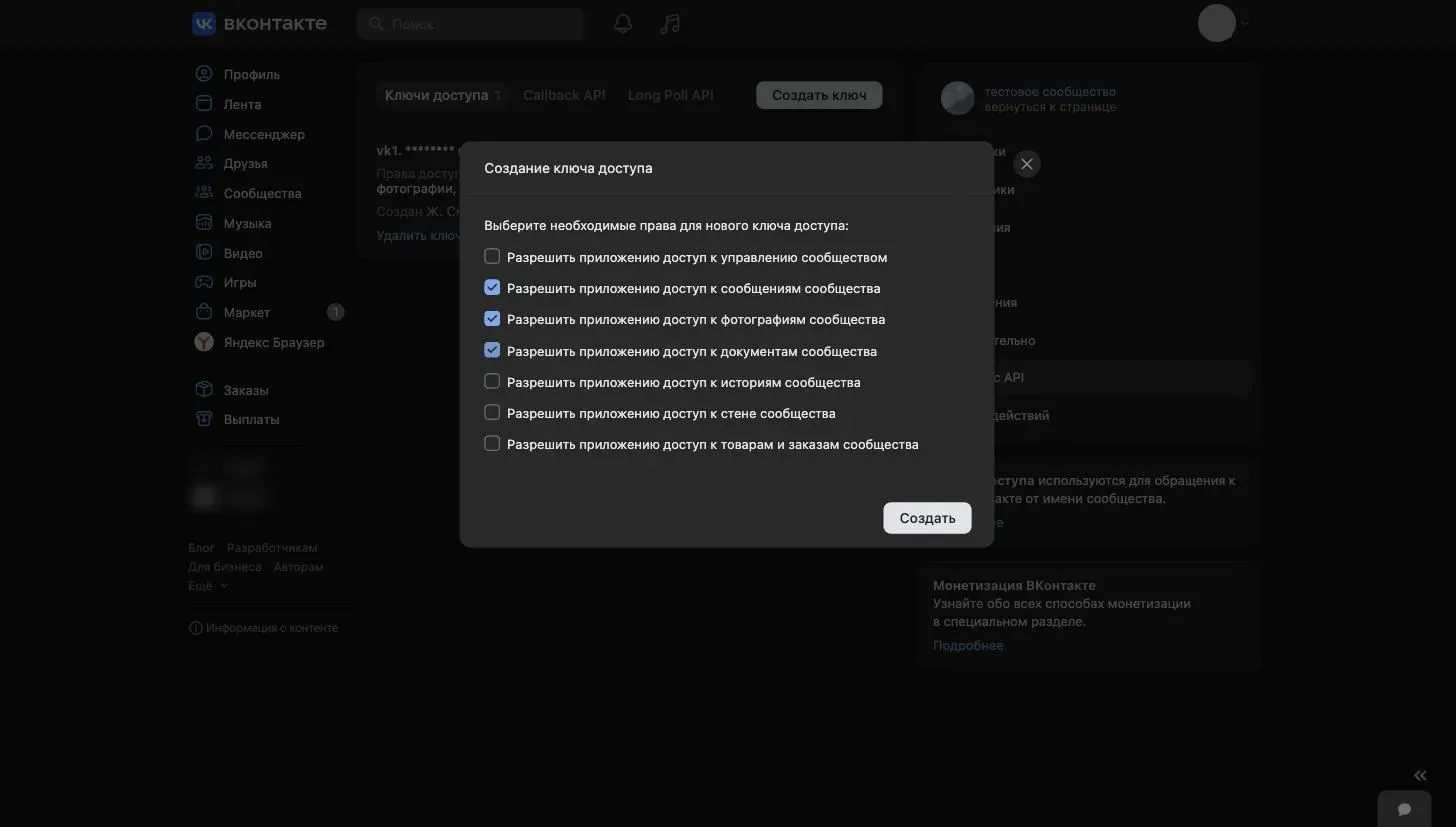 Three permissions: messages, photos and documents. The bot needs nothing else.
Click “Create” and confirm with the code VK sends you. The key appears in the list — click “Show” and copy it.
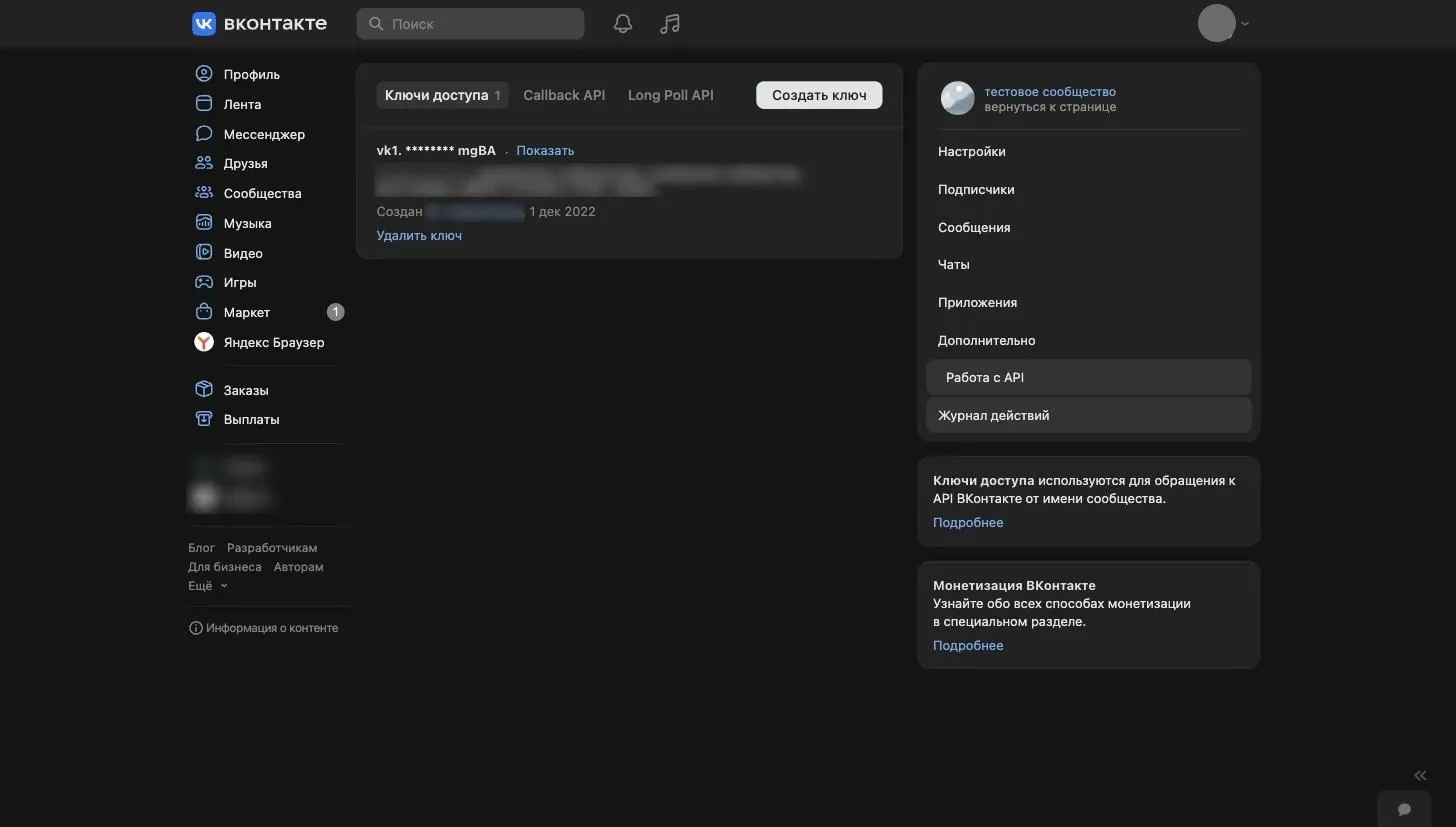 The key is hidden by asterisks — “Show” reveals it in full.
The key gives access to the community's messages — never send it to anyone. If it leaks, delete it right here and reconnect the channel with a new key.
Step 5. Paste the key into GPTunneL
Go back to the bot tab and click “Connect” on the VK card. A three-step connection window opens. Paste the key into the “Community access key” field.
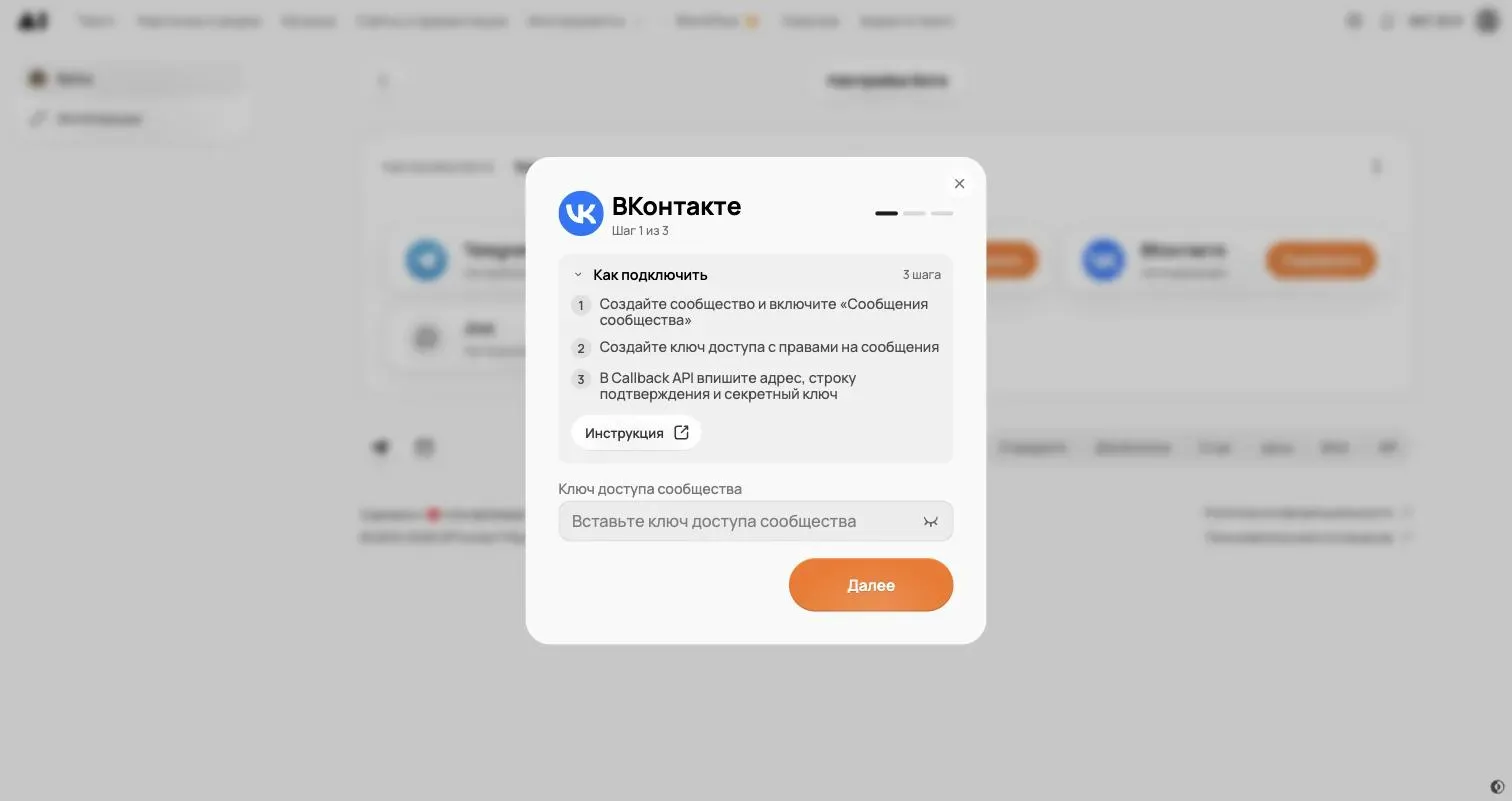 Step 1 of 3: the community access key.
GPTunneL checks the key with VK right away. If it's valid, the window header shows your community's avatar and address instead of “Step 1 of 3” — so you can see you're connecting the right one.
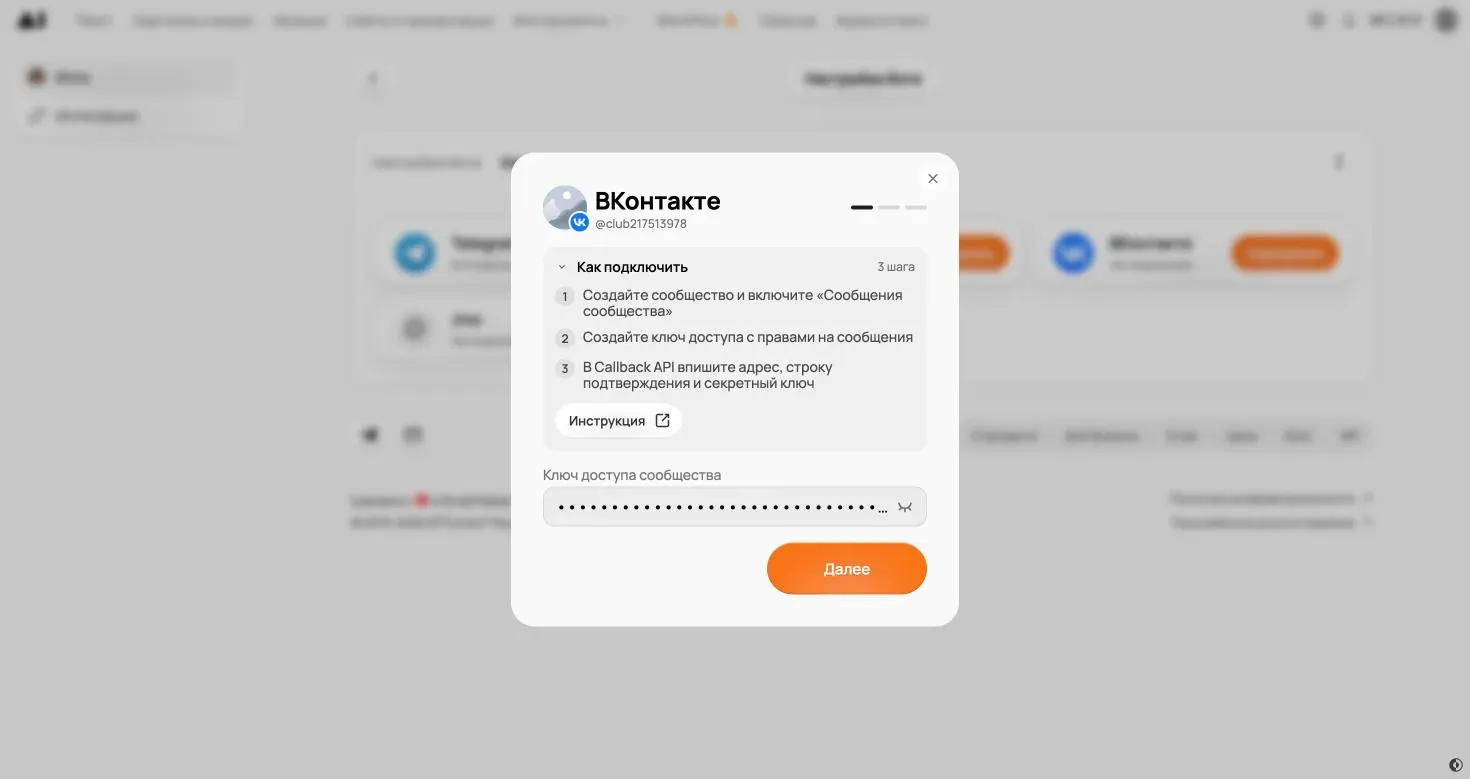 Key accepted: the header shows the community avatar and address (@club217513978). Click “Next”.
Step 6. Link GPTunneL and Callback API
This is the trickiest step: values have to be copied in both directions. Keep two tabs open — the connection window in GPTunneL and “API usage” → “Callback API” in VK.
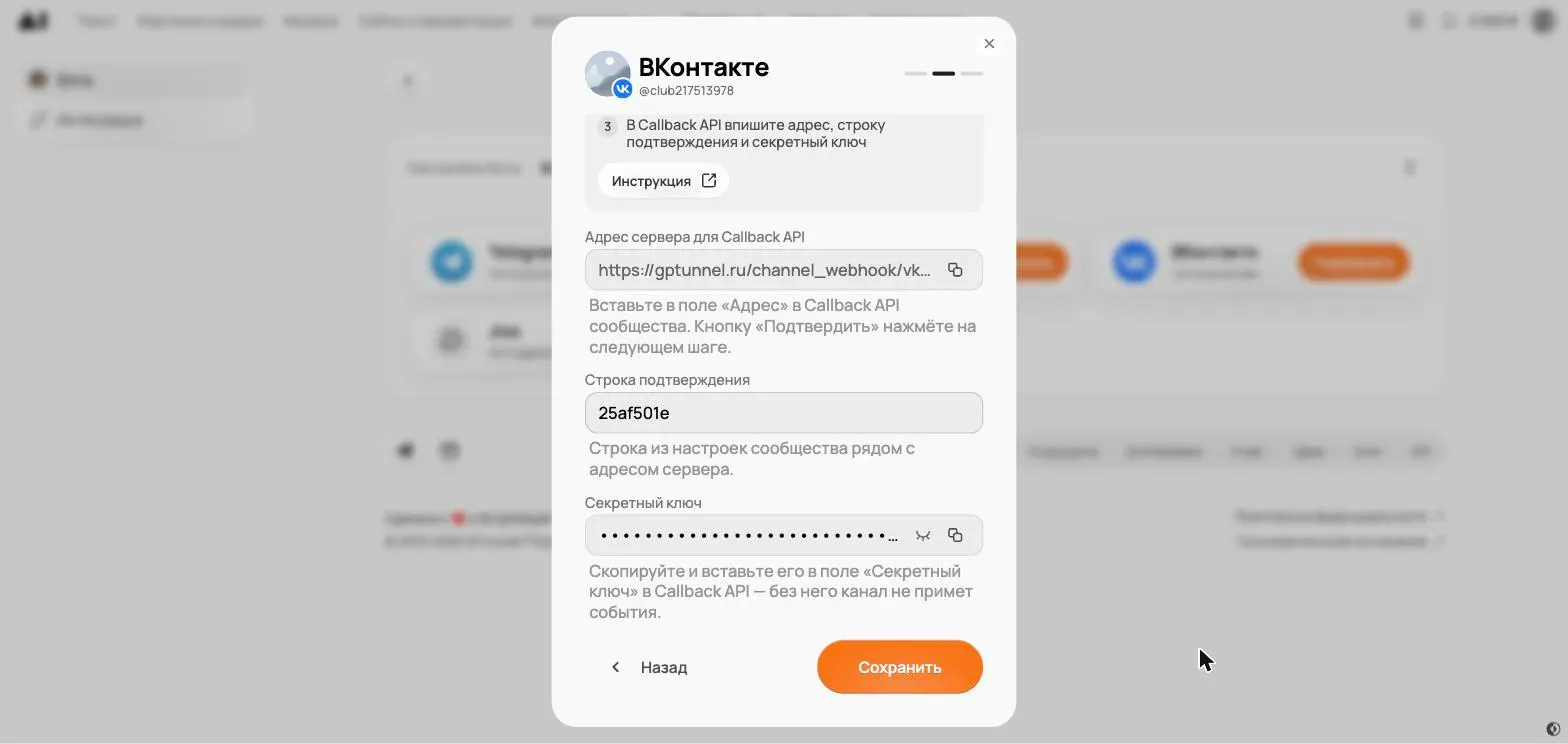 Step 2 of 3 in GPTunneL: server address (copied with the button on the right), confirmation string and secret key.
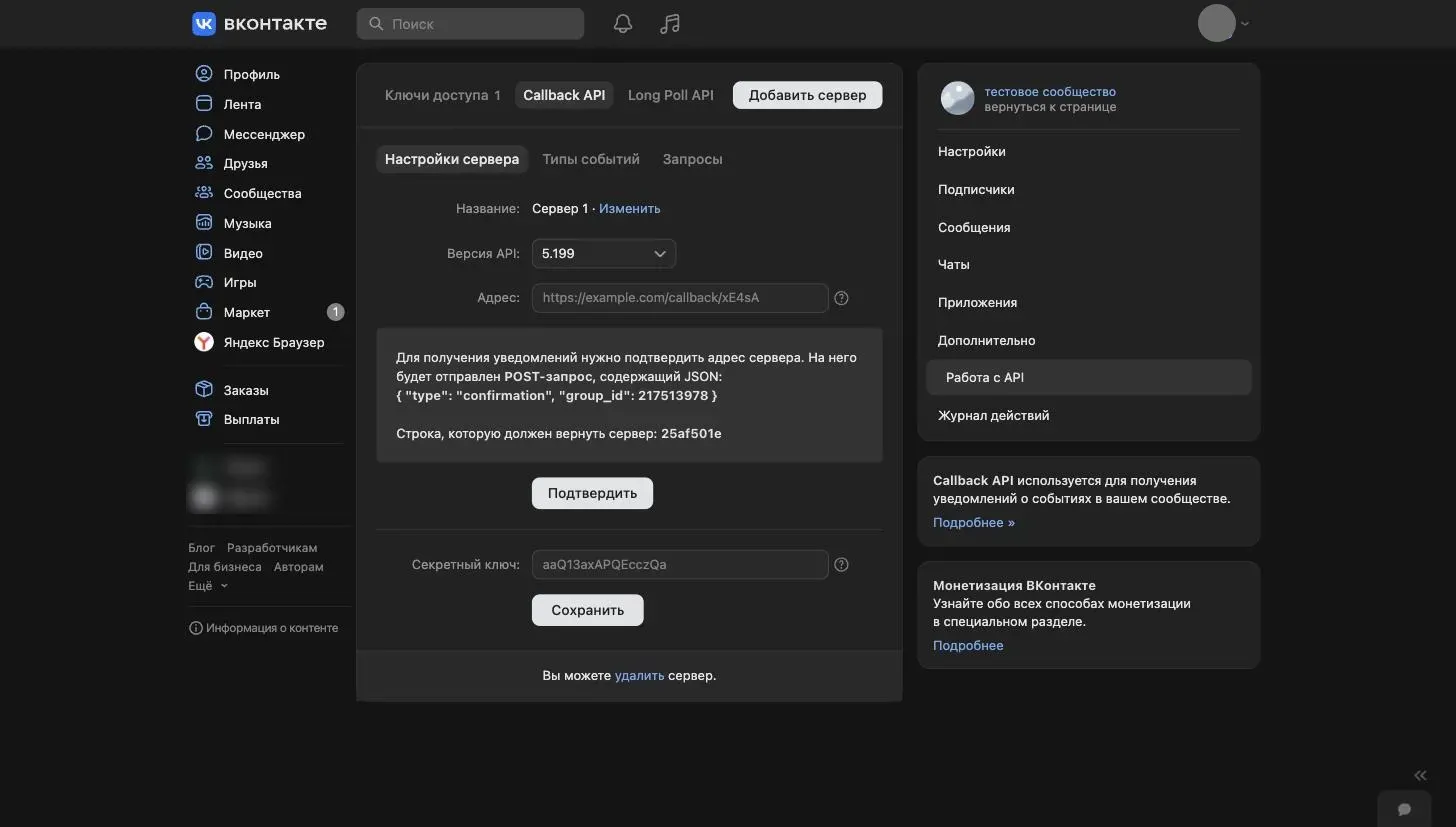 Callback API in VK. If there's no server yet, click “Add server” — the same form appears.
What goes where:
| Value | Where to take it | Where to paste it |
|---|---|---|
| Server address | GPTunneL, the “Server address for Callback API” field — copy button on the right | VK, the “Address” field |
| Confirmation string | VK, the line “String to be returned by the server” (8 characters) | GPTunneL, the “Confirmation string” field |
| Secret key | GPTunneL, the “Secret key” field — copy button on the right | VK, the “Secret key” field at the bottom of the form |
In this order:
-
API version in VK — keep the latest one (5.199 or newer).
-
Copy the confirmation string from VK and paste it into GPTunneL.
-
Copy the secret key from GPTunneL, paste it into the “Secret key” field in VK and click “Save” below it. VK replies that the secret key was saved.
-
Copy the server address from GPTunneL and paste it into the “Address” field in VK. Don't click anything yet.
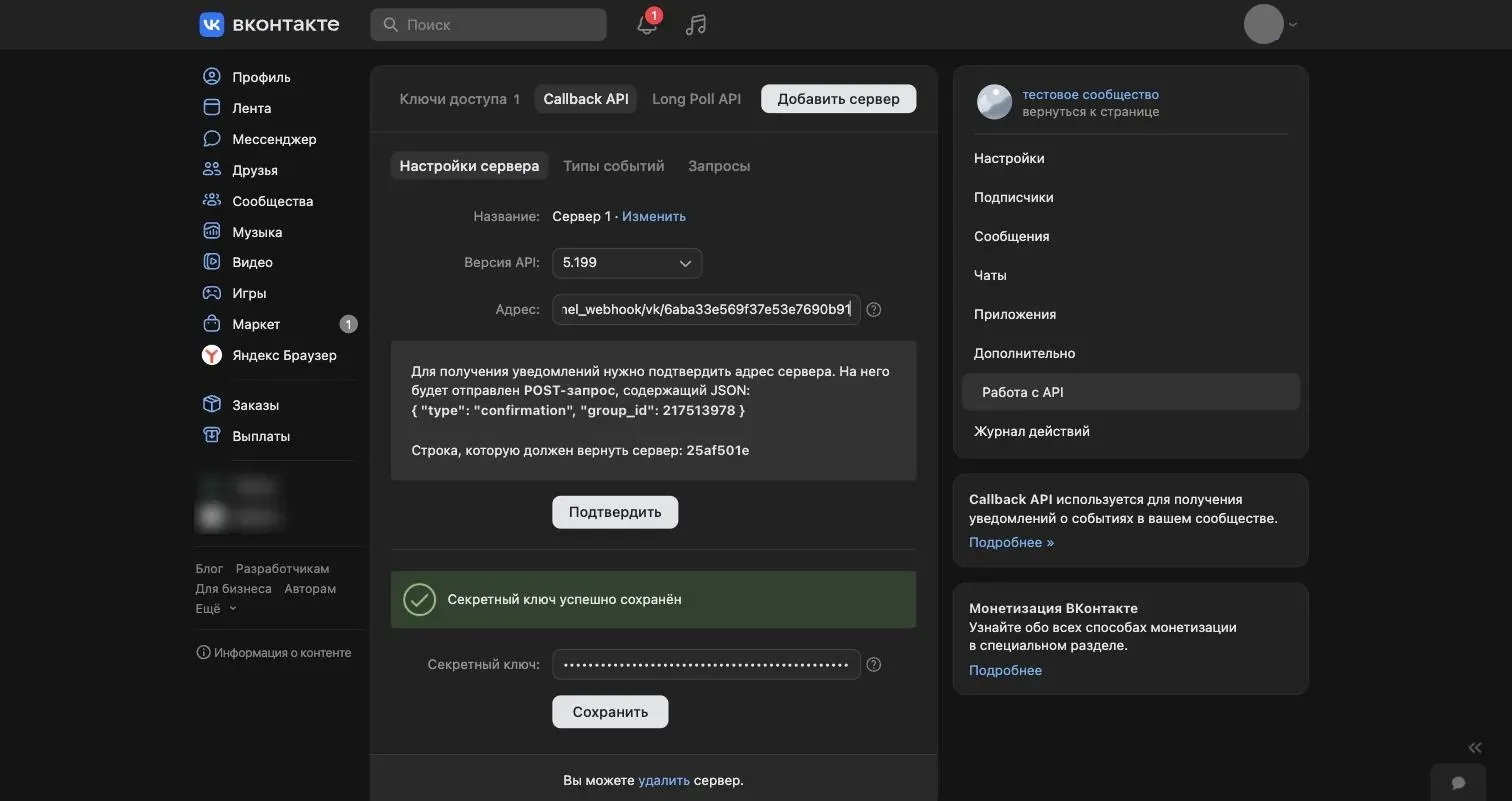 Address pasted, secret key saved. We'll click “Confirm” in the next step.
 -
Go back to GPTunneL and click “Save” — the window moves to step 3, “Waiting for address confirmation”.
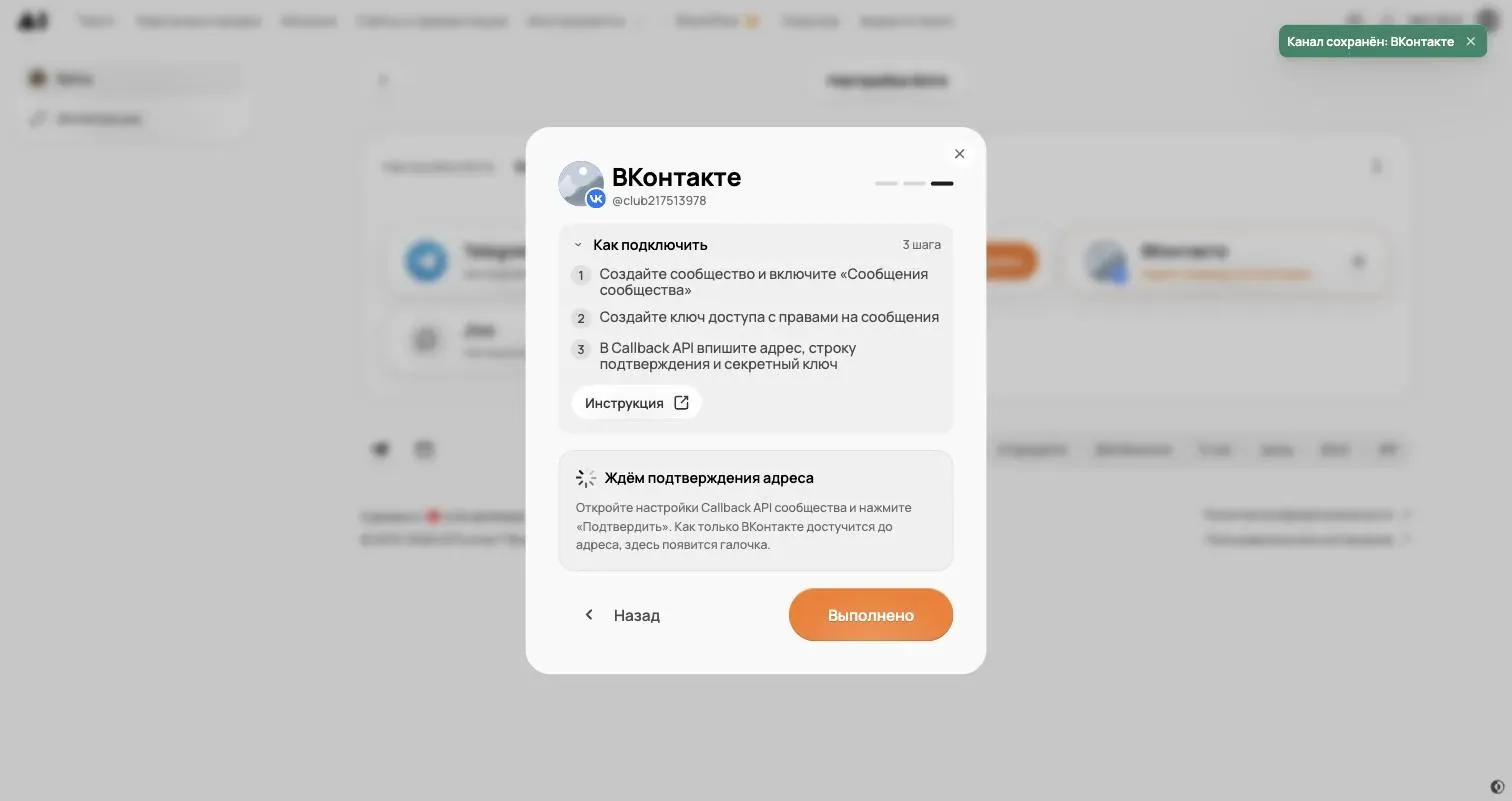 Step 3 of 3: GPTunneL has stored the confirmation string and waits for VK to call the address.
Save in GPTunneL before you click “Confirm” in VK: otherwise GPTunneL doesn't yet know which string to return, and VK won't accept the address.
Step 7. Confirm the address
In VK, click “Confirm” under the address. VK sends a test request to the address, GPTunneL replies with the confirmation string, and a message that the server address was saved appears above the form.
Go back to the GPTunneL tab: within a few seconds the window shows “Address confirmed”.
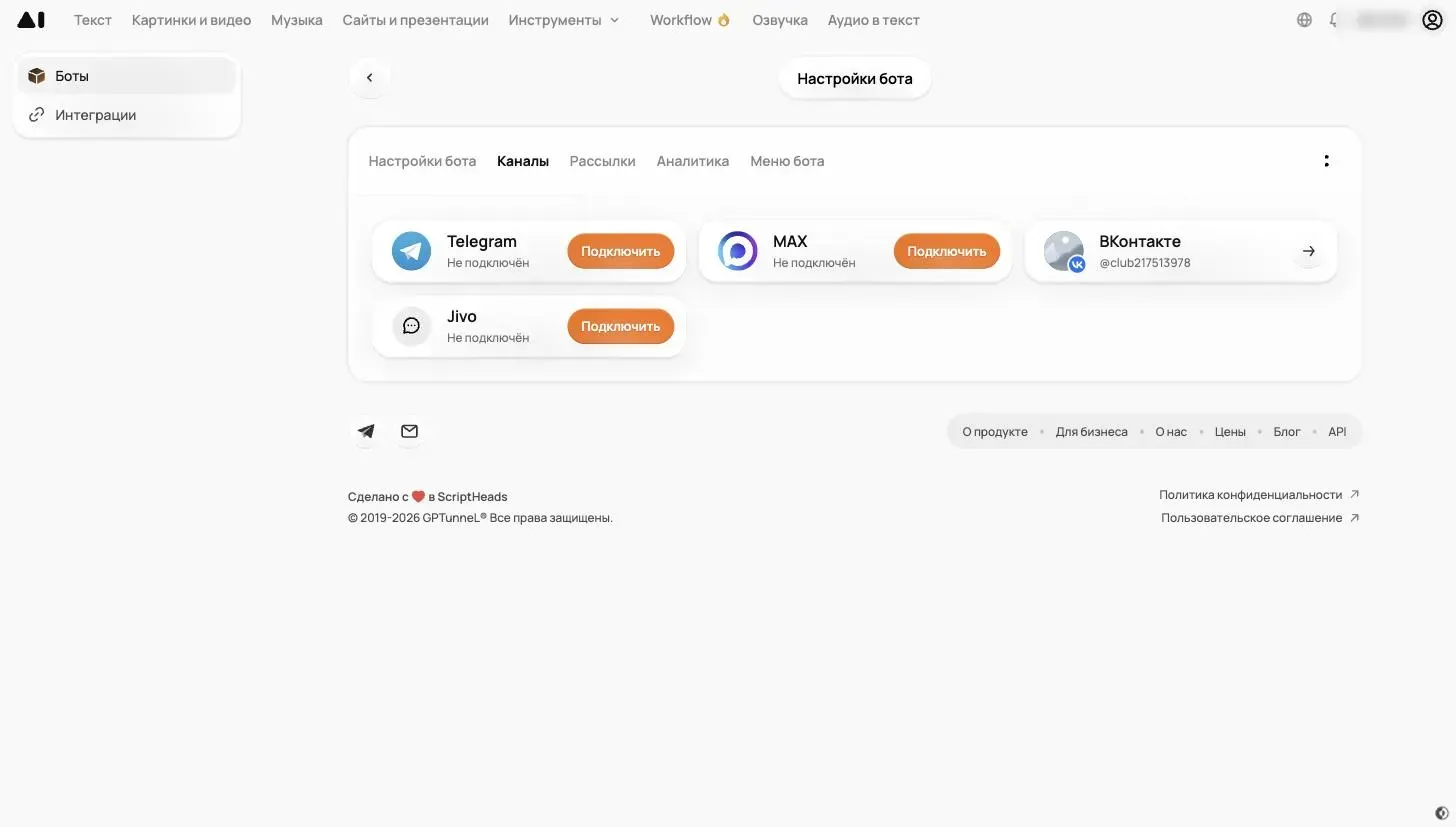 Done: the VK card shows the community avatar and address instead of “Not connected”.
If you see “Address not confirmed” instead, click “Back” and check the confirmation string and the secret key — most often a character gets lost when copying. Then click “Save” in GPTunneL and “Confirm” in VK again.
Step 8. Enable event types
This is the step people skip most often. Without it the address is confirmed and the channel is connected, but the bot stays silent: VK simply doesn't send it any messages.
In VK, open the “Event types” tab in Callback API and, in the “Messages” group, tick:
- Incoming message — without it the bot won't see a single message;
- Message event — presses on the bot's menu buttons.
You don't need the other checkboxes. VK saves them immediately, without a separate button.
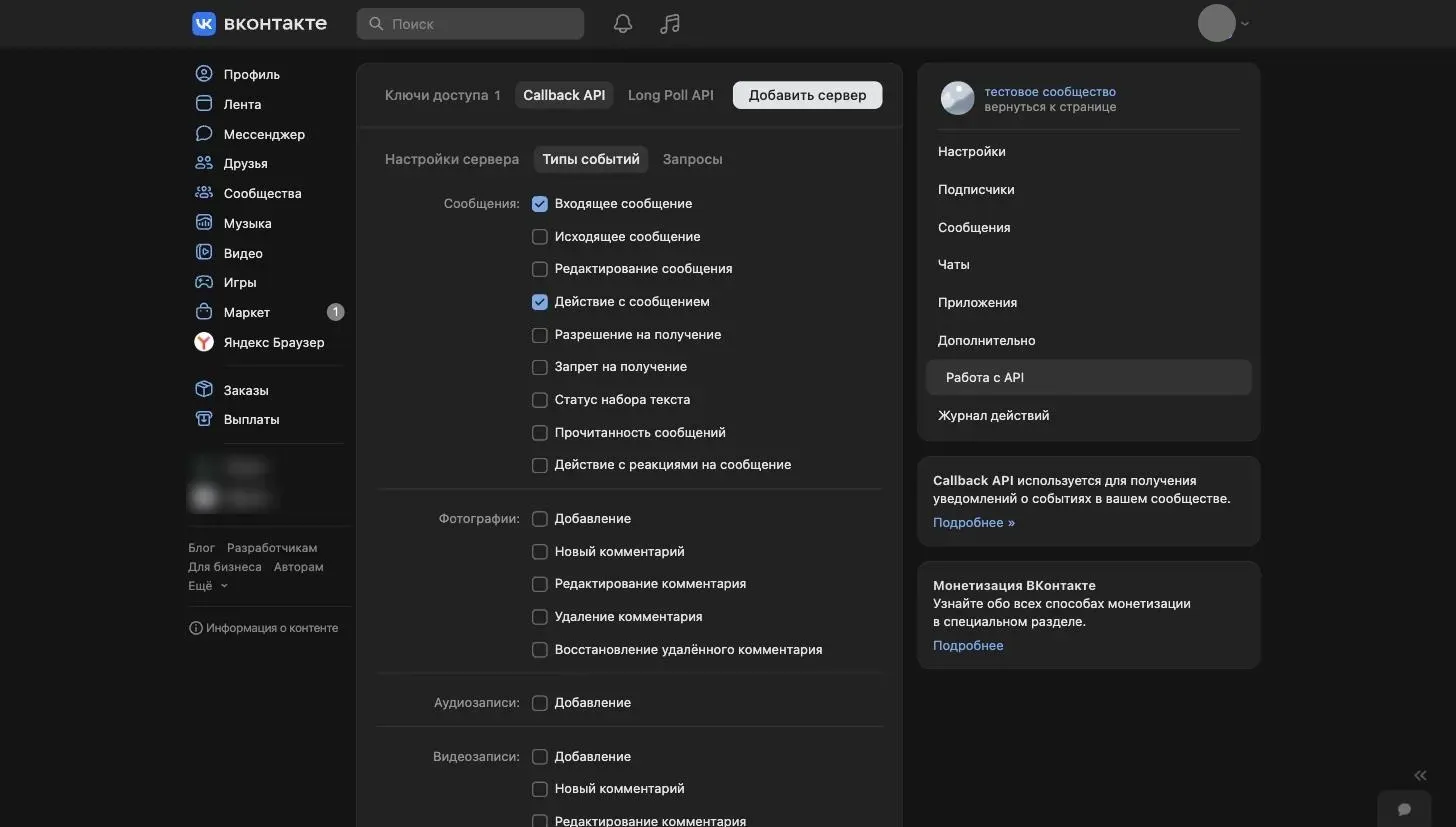 You need “Incoming message” and “Message event”.
Step 9. Test the bot
Open a chat with the community — from your phone or another account — and press “Start”.
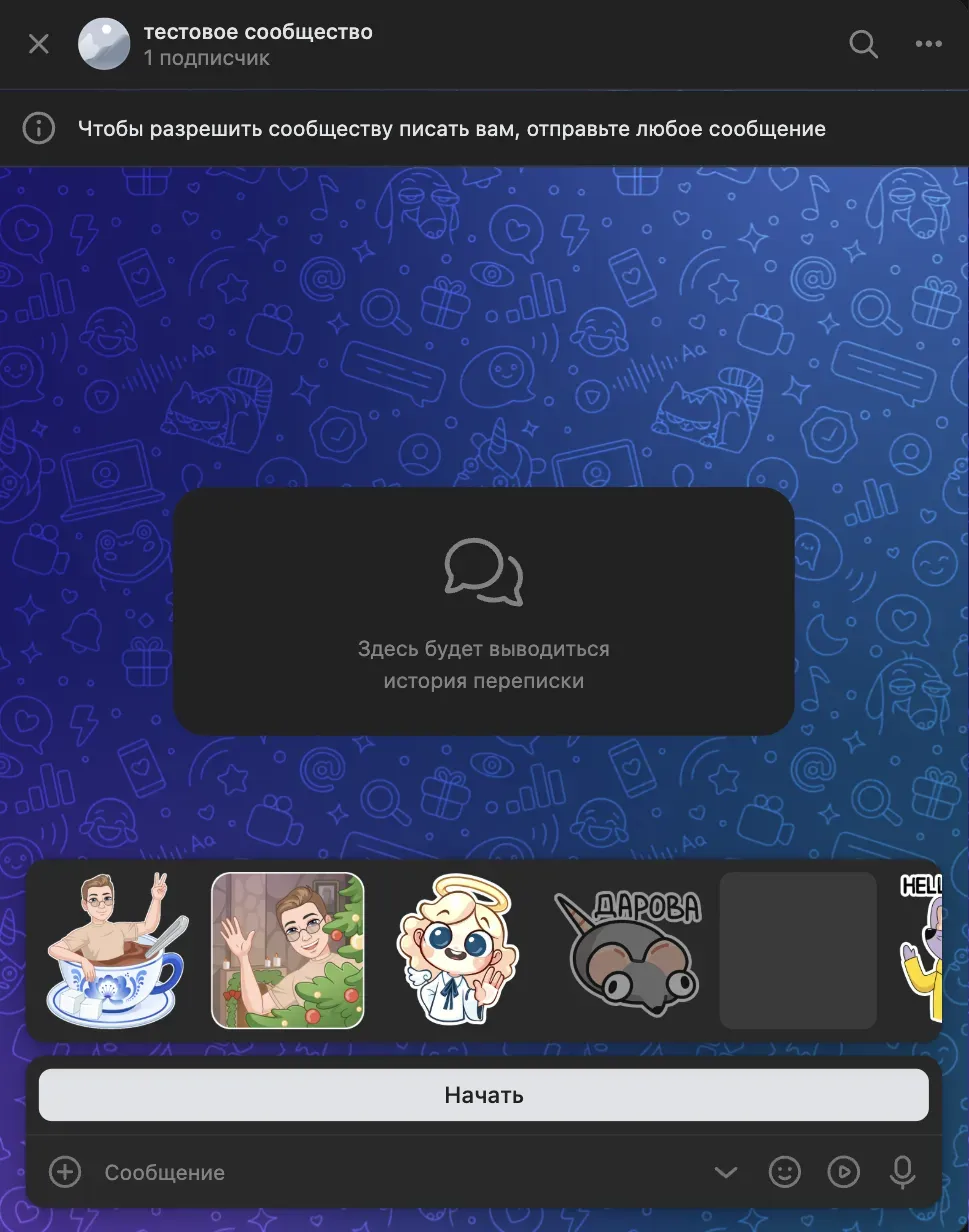 A new visitor sees the “Start” button — we enabled it in step 3.
The welcome message from the bot settings arrives in response. Ask a question — the bot answers according to your instructions.
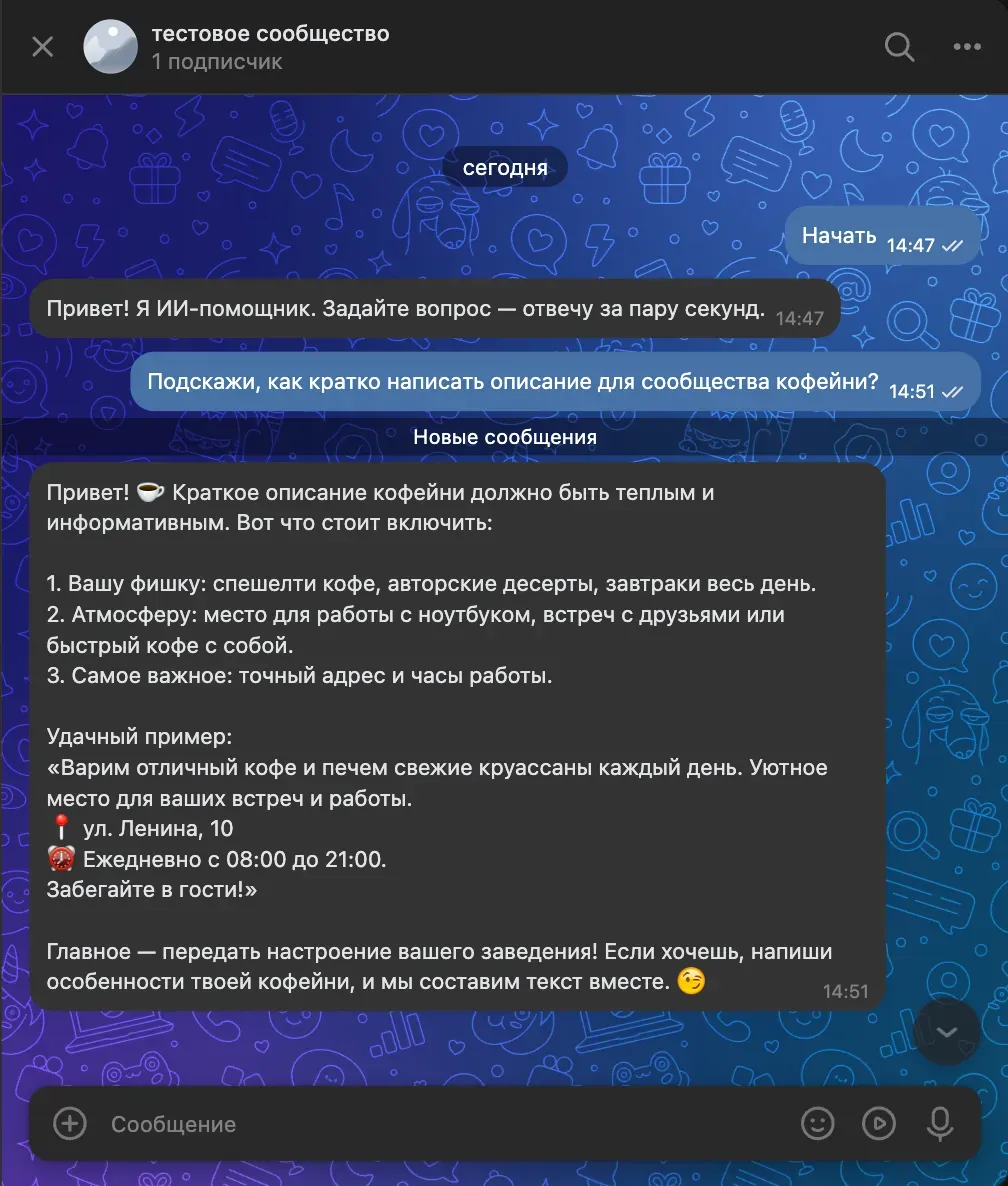 The welcome message and the first AI reply in the community's messages.
All conversations are visible in GPTunneL too: click the arrow on the VK card in the “Channels” tab. From here you can read a conversation, open it in VK or reply to the person on behalf of the bot.
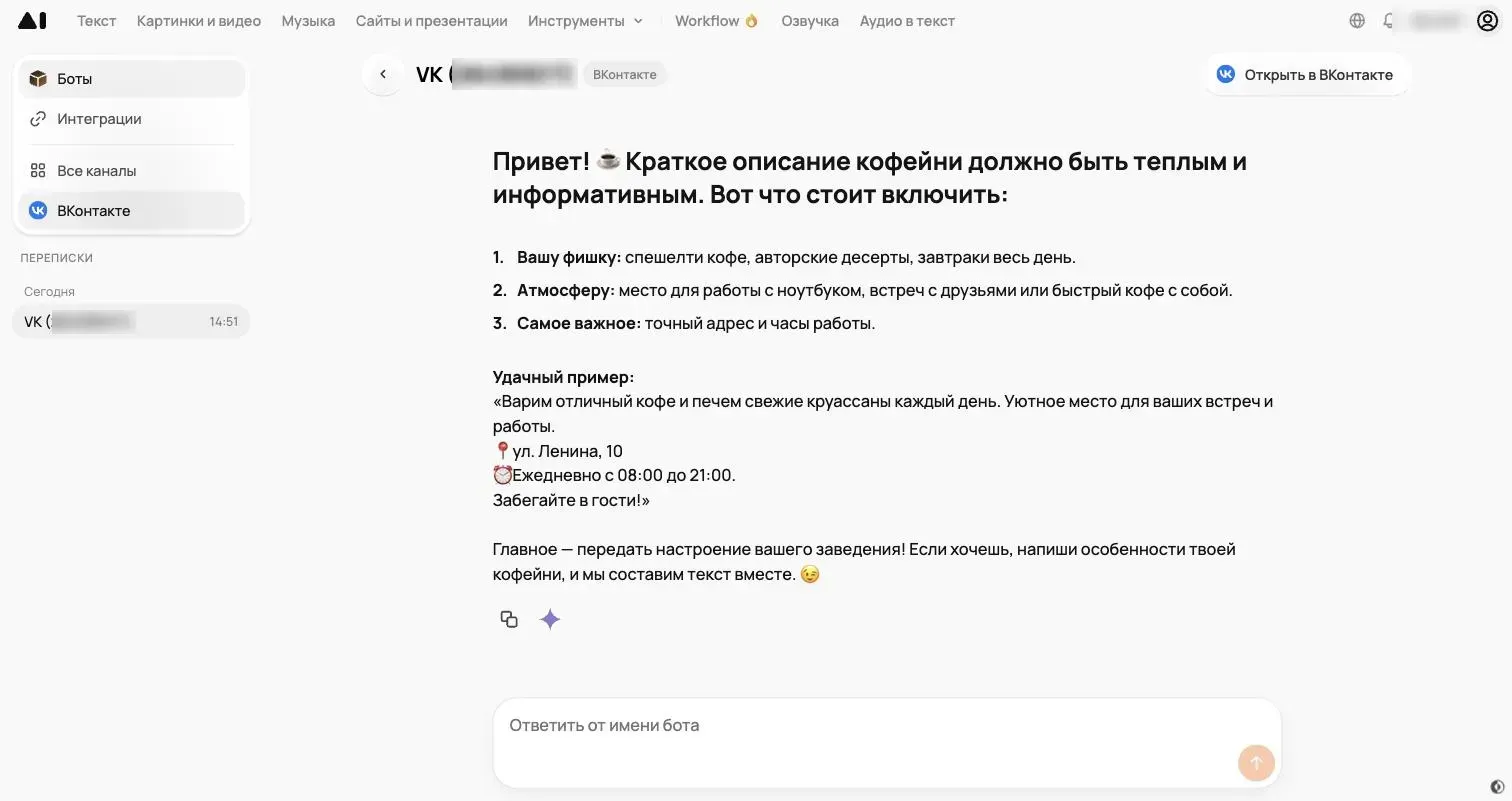 VK channel conversations in GPTunneL: you can reply manually right from this window.
If the bot doesn't reply
| What you see | What to check |
|---|---|
| The address isn't confirmed | The confirmation string and the secret key — they must match character for character |
| The address is confirmed, but the bot is silent | Event types: is “Incoming message” ticked |
| The bot replies, but the menu buttons don't work | “Bot features” are enabled and the “Message event” event is ticked |
| The bot stopped replying | Your GPTunneL balance and the bot's daily limits |
| The GPTunneL window is stuck on “Waiting for address confirmation” | Whether you clicked “Confirm” in VK and saw that the server address was saved |
| Nobody can write to the community | “Community messages” are enabled |
What's next
The bot already works, but this is only the foundation. In the bot settings you can:
- limit the number of messages per day for each person, so costs stay under control;
- protect the bot with a password or let it reply only to “Trusted accounts” — in VK this is the short name from the page address;
- build a menu with buttons in the “Bot menu” tab;
- connect the same bot to Telegram and MAX — with the same instructions and the same model.
Describe the bot well once — and it will answer your followers at any hour while you get on with your work.
Read also: